
Table of Contents
- Assess Your Space: Ceiling Height, Clearances, and Building Code Requirements
- Small Kitchen Layout Ideas for Low-Ceiling Spaces
- Low Ceiling Kitchen Lighting Solutions That Create Height
- Small Kitchen Cabinet Ideas That Work With Low Ceilings
- Color and Finishes: Making Your Low-Ceiling Kitchen Feel Larger
- Small Kitchen Renovation Planning: Budget, Timeline, and Sequencing
- Keeping Your Home Livable During Renovation
- Frequently Asked Questions
Last Updated: October 9, 2026
Assess Your Space: Ceiling Height, Clearances, and Building Code Requirements
Before picking colors or cabinets, measure precisely. A low ceiling kitchen has real constraints; understanding them upfront prevents costly mistakes.
Measure ceiling height from floor to the lowest point, checking for soffit drops, ductwork, or pipes. Record these measurements for every decision ahead.
Building codes in your jurisdiction set minimum clearance requirements. The National Building Code of Canada establishes standards for kitchen work surfaces, lighting, and ventilation.
Homeowners often underestimate how codes affect low-ceiling kitchens.
Check for existing mechanical systems. What’s above your ceiling shapes what’s possible after renovation.
Small Kitchen Layout Ideas for Low-Ceiling Spaces
A low ceiling doesn’t mean your kitchen layout must be cramped. The right layout maximizes usable space and improves workflow. Three layouts work especially well in tight, low spaces.
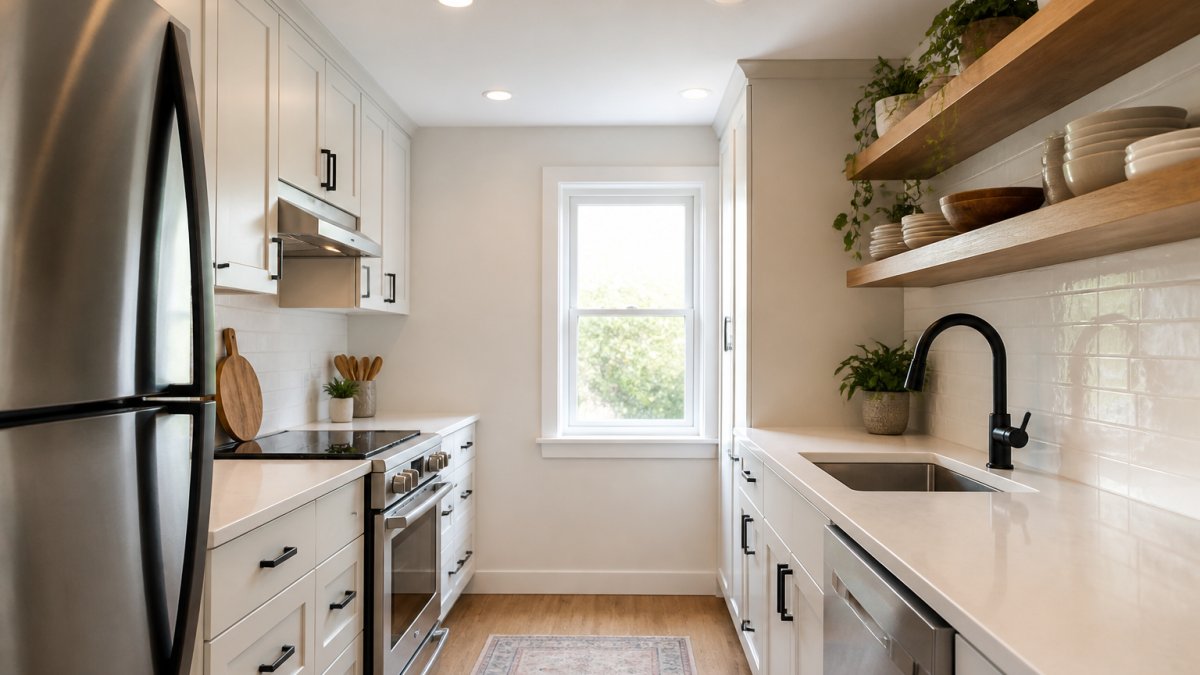
Galley Kitchens
Galley layouts run two parallel counters with a walkway between. They work well in low-ceiling spaces because they concentrate activity in a narrow zone, so the room feels organized rather than cramped.
Galley kitchens keep everything within arm’s reach, so you don’t waste steps. The compact footprint means one-directional traffic reduces congestion.
The main drawback: galleys feel tight with more than one person working, since the walkway becomes a bottleneck. Great for solo cooks or couples who cook separately; consider alternatives for large families cooking together.
Single-Wall Layouts
Single-wall kitchens line appliances, sink, and storage along one wall, maximizing open floor space elsewhere, ideal for open-plan living where the kitchen doesn’t dominate.
Single-wall layouts suit small apartments and condos, requiring fewer cabinet runs and shorter plumbing and electrical runs.
The trade-off: less counter space and storage, so everything must work harder with efficient organization and compact appliances. It suits people who don’t cook elaborate meals or spend minimal time in the kitchen.
L-Shaped Configurations
L-shaped kitchens use two adjacent walls, offering more counter space and storage than single-wall layouts while staying compact. The corner becomes a natural focal point for an island or breakfast nook.
L-shapes provide good workflow, with the sink on one wall and the stove on another, plus more storage than single-wall and more openness than galley.
The corner can be awkward to access, and dead space accumulates in corner cabinets. Modern pull-out systems help but add cost, so plan corner storage carefully during design.
Low Ceiling Kitchen Lighting Solutions That Create Height
Lighting is the secret weapon in low-ceiling kitchens. Good lighting makes the room feel taller, brighter, and more open; poor lighting makes it cave-like. Your lighting plan matters as much as your layout.
Recessed and Flush-Mount Fixtures
Recessed lights sit flush with the ceiling and don’t hang down, which is critical in low spaces. Pendants and chandeliers eat ceiling height; recessed lights preserve every inch.
Recessed fixtures also create even illumination, eliminating dark corners. Modern recessed LEDs run cool, use little energy, and last years.
Spacing matters: recessed lights should sit approximately 1.2 to 1.8 metres apart. Too few create shadows, too many waste energy, so work with your contractor to calculate spacing for your ceiling height.
Flush-mount fixtures attach directly to the ceiling with no drop, a good alternative if recessed installation isn’t possible. Semi-flush fixtures drop slightly but preserve more height than pendants.
Task Lighting and Under-Cabinet Strips
Task lighting targets specific work zones: the sink, stove, and prep areas. Under-cabinet LED strips illuminate countertops without using ceiling space.
LED strips are affordable, easy to install, energy-efficient, and generate minimal heat. Mount them under upper cabinets so light spills onto counters.
Task lighting also reduces eye strain. Good light at work surfaces makes cooking and prep easier and safer, especially in low-ceiling kitchens where overall lighting is constrained.
Maximizing Natural Light
Windows and skylights bring daylight into your kitchen. Natural light makes any room feel bigger and more open. In low-ceiling kitchens, it’s transformative.
Keep windows clear: avoid heavy curtains or backsplashes that block light, and choose light-colored window treatments. Skylights add light without using wall or counter space, though installation costs more than windows.
Mirrors and reflective surfaces bounce light around the room. A mirror opposite a window doubles the effect, and glossy cabinet finishes and light-colored backsplashes amplify light.
Small Kitchen Cabinet Ideas That Work With Low Ceilings
Cabinets occupy most of a kitchen’s visual space, shaping whether the room feels open or cluttered. Low-ceiling kitchens need smart cabinet strategies.
Ceiling-Height Cabinetry
Cabinets that extend from counter to ceiling maximize storage and create clean sight lines, eliminating the dead space above traditional cabinets. Your eye travels unbroken from floor to ceiling, making the room feel taller.
Ceiling-height cabinets also reduce visual clutter: everything has a place, countertops stay clear, and the room looks organized even in a tight footprint.
The trade-off: ceiling-height cabinets cost more than standard 30-inch or 36-inch uppers. Installation is more complex. You lose the flexibility to change things later.
Light-colored cabinet finishes amplify the effect: white, cream, or light gray recede visually, while dark cabinets advance and shrink the space.
Open Shelving and Vertical Storage
Open shelving works best when styled thoughtfully: display attractive dishes, glasses, and cookbooks, and avoid clutter. Messy open shelving makes kitchens look cramped, not spacious.
Vertical storage uses wall space you might otherwise miss. Pegboards, hooks, slim shelving, magnetic knife strips, and wall-mounted spice racks add storage without taking up counter or floor space.
Open shelving also costs less than closed cabinets, a good option on a tight budget. Mix the two: open shelves for display, closed cabinets for everyday items.
Removing Soffits for Visual Space
Soffits are bulky structural elements hanging from the ceiling, often unnecessary. Removing them opens up the ceiling visually and sometimes physically.
Before removing a soffit, verify it doesn’t hide ductwork, plumbing, or electrical lines. Some are structural, so removal requires engineering. Work with a contractor who understands building codes; a mistake here is expensive and dangerous.
When soffits can be removed, the payoff is significant: the ceiling feels higher, the room more open, and you gain cabinet space above.
If removal isn’t possible, paint the soffit the same color as the ceiling to minimize its visual impact, and avoid drawing attention with trim or accent colors.
Color and Finishes: Making Your Low-Ceiling Kitchen Feel Larger
Color choices reshape how a low-ceiling kitchen feels: light colors expand, dark colors contract, glossy finishes reflect light, matte finishes absorb it.
Light cabinet colors are the foundation: white, cream, light gray, and soft pastels recede visually so the space feels open.
Wall colors should match or complement cabinets. Continuous color from cabinet to wall eliminates visual breaks and creates a seamless plane that feels larger.
Backsplashes and countertops should also be light or neutral. Busy patterns and dark colors draw the eye. They create visual noise.
Flooring should be light to medium tone.
| Color Element | Best Choice | Why | Avoid |
|---|---|---|---|
| Cabinets | Light (white, cream, pale gray) | Recedes visually, opens space | Dark colors, bold patterns |
| Walls | Match cabinet color or soft neutral | Creates seamless plane | High-contrast accent walls |
| Backsplash | White, light gray, or simple subway tile | Keeps visual focus on space | Dark colors, busy patterns |
| Counters | Light to medium neutral | Reflects light, feels open | Very dark, high-contrast colors |
| Flooring | Light to medium, glossy finish | Reflects light, appears larger | Dark matte finishes |
Small Kitchen Renovation Planning: Budget, Timeline, and Sequencing
Renovation success depends on planning. Low-ceiling kitchens have specific constraints that affect sequencing, cost, and timeline. Understanding these upfront prevents problems.
Phase 1: Structural and Mechanical Work
Start with structural and mechanical work: soffit removal, ductwork relocation, plumbing moves, and electrical rewiring. These must happen first because they affect everything else.
Structural work requires engineering approval. If you’re removing a soffit or relocating walls, hire a structural engineer. It costs money upfront but prevents code violations and safety issues, and building permits depend on that approval.
Mechanical work, moving ducts, pipes, and wiring, should happen before cabinet installation. It’s easier and cheaper to reroute systems in an empty space than around installed cabinets. This phase typically takes 2-4 weeks.
Phase 2: Cabinetry and Built-Ins
After structural and mechanical work, install cabinets, countertops, and backsplash. This is the visible transformation, and where costs accumulate.
Cabinet installation in low-ceiling kitchens requires precision. Ceiling-height cabinets must be perfectly level and plumb, since uneven installation creates visible gaps. Hire experienced installers.
Countertops follow cabinet installation: measure after cabinets are in place, and allow 2-3 weeks for fabrication. Backsplash installation happens once countertops are set.
This phase typically takes 4-6 weeks. It’s the longest phase of renovation.
Phase 3: Finishes and Testing
The final phase includes painting, flooring, lighting installation, and appliance hookup, where the kitchen becomes functional.
Lighting installation should happen before final paint, since recessed lights require ceiling access. Flooring goes in after walls and ceilings are finished.
Appliance installation and hookup come last. Gas, electrical, and plumbing connections happen once everything else is done. Testing and adjustments follow. This phase takes 2-3 weeks.
Cost Considerations and Trade-Offs
Low-ceiling kitchens often cost more than standard kitchens because of structural and mechanical complexity. Removing soffits, relocating ducts, and installing ceiling-height cabinets add expense. Budget accordingly.
Material choices affect cost significantly: stock cabinets cost less than semi-custom or custom, and fixtures, countertops, and flooring grades all impact the total.
Labor costs vary by region and contractor experience. Experienced contractors who specialize in small kitchens work more efficiently and understand the constraints; inexperienced ones often underestimate complexity and overrun budgets.
RWF Custom Contracting provides transparent written quotes before starting work, outlining material costs, labor, and timeline, and identifying potential complications upfront to prevent surprises and cost creep.
Keeping Your Home Livable During Renovation
Kitchen renovation is disruptive: you lose cooking facilities, and dust and noise affect the whole home.
Contain dust with plastic sheeting. Seal off the kitchen from the rest of the home.
Daily site cleanup is essential. Debris accumulates fast, and a clean site is safer and more organized.
Communication matters.
Renovating a small kitchen with low ceilings is challenging but achievable.
RWF Custom Contracting provides comprehensive renovation services for homeowners in Hamilton, Stoney Creek, Burlington, and the surrounding Golden Horseshoe. If you’re planning a low-ceiling kitchen renovation, get a quote from RWF Custom Contracting at https://Rwfcustomcontracting.com.
Frequently Asked Questions
What is the minimum ceiling height for a functional kitchen renovation?
Building codes do not mandate a specific minimum ceiling height for kitchens, but 2.1 metres (approximately 7 feet) is often considered the practical floor for comfortable use. Below that, tall household members may feel cramped, and standard cabinetry becomes difficult to install. If your ceiling is below 2.1 metres, consider open shelving or shorter cabinet runs to maintain usability and avoid a claustrophobic feel during your low ceiling kitchen renovation.
Should cabinets extend all the way to the ceiling in a small kitchen with low ceilings?
Yes, extending cabinets to the ceiling maximizes storage and creates a sense of height by drawing the eye upward. This works especially well in small kitchens with low ceilings because it eliminates the visual gap that makes rooms feel shorter. Use light finishes or open shelving near the top to prevent the space from feeling heavy or closed-in. This strategy is one of the most effective small kitchen cabinet ideas for low-ceiling spaces.
What lighting works best in a kitchen with a low ceiling?
Recessed lights and flush-mount fixtures are ideal because they sit flush with the ceiling and don’t hang down. Pair these with under-cabinet task lighting and natural light from windows or skylights to brighten the space without adding visual bulk. Avoid pendant lights or chandeliers that hang down, as they reduce perceived ceiling height. Low ceiling kitchen lighting should prioritize brightness and minimal visual obstruction to make the room feel more open and airy.
How do I plan a small kitchen renovation to stay on budget and avoid delays?
Break the project into phases: structural and mechanical work first, then cabinetry and built-ins, then finishes. Establish a written timeline and budget for each phase before starting, and work with a contractor who manages the entire project in-house to avoid delays from coordinating multiple trades. Get a transparent quote upfront that includes contingencies for unexpected issues. Small kitchen renovation planning requires clear communication with your contractor about priorities so you can make informed trade-offs if costs rise.